3D Printing
What is 3D Printing?
Building a 3D Digital Model with 3D Scanning
3D Scanning is an incredibly accurate method for capturing the size and shape of an object. That is why manufacturers and hobbyists alike turn to this process as a first step in the reverse engineering process. Various methods can be employed to scan a small part, including handheld 3D scanners and Industrial computed tomography (CT) scanning.
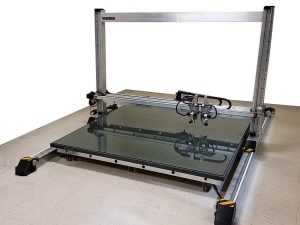
Many are unaware the 3D scanning can also be used develop a model for larger objects that must be modeled and duplicated. Perhaps there is a full size prototype you have built by hand that needs to be digitized. Or perhaps your product needs to be adapted to fit an existing object. 3D laser scanning can capture large forms for digitization and CAD modeling, allowing 3D printable designs to be created. Large objects can be duplicated by first scanning them so that an exact reproduction can be created on a large format 3D printer.
Pros & Cons of 3D Scanning for 3D Printing File Preparation
Pros of 3D Scanning for Generating CAD Models for 3D Printing
- Speed: Very large parts with complex geometry can be captured very quickly.
- Accuracy: Scanning can pick up minute subtleties on the part, from holes and odd angles to slight surface variations. If precision measurement is desired when creating the master model, 3D scanning is the way to go.
- Portability: Scanning can be done on site. Most service providers will bring the scanner to you. You can also use your own handheld scanner or send your part out for Industrial computed tomography (CT) scanning. Whether it is a fiberglass mold or an airplane wing. there are multiple scanner options and companies that come to you for convenient onsite capture.
Cons of 3D Scanning for Generating CAD Models for 3D Printing
- Cost: 3D scanning for a part starts at $300 and usually runs more than that. If the project is for part replacement or a hobby, the cost could exceed the value of the part or the entire unit.
- Accuracy: How can accuracy be a pro and a con? Scanning picks up the flaws. Scanners can be accurate to a fault sometimes. All parts have some form of defect to one degree or another. Tubes may not be perfectly round, plates may not be perfectly flat, skins may not be perfectly smooth, etc. Scanning picks of all of these flaws which sometimes must be digitally removed.
Creating a 3D CAD Model File
Types of 3D Cad Model Files
There are numerous 3D cad model file types. These files fall into 3 categories: Native, Neutral, and Specialized. Native file formats were created by the software companies that developed CAD applications. Examples include AutoCAD (.dwg) – the original CAD file – as well as SolidWorks (.sldprt and .sldasm) and SketchUp (.skp). Although compatible with other software, generally native file types work best in their parent software.
Neutral file formats are made to be compatible with multiple types of CAD software. While there is some loss of detail due to the reduced amount of metadata they contain, they are excellent for team projects and general 3D modeling. Examples include:
- Stereolithography Files (.stl) define models based on surface geometry and triangular shapes. They lack details such as color and texture, so they are not usable for more complex CAD designs. However, their surface mesh structure makes them a great choice for 3D printing and other rapid prototyping techniques.
- Additive Manufacturing (.amf) files define the 3D CAD object using an XML derivative. This is an open format and the most commonly used for 3D printing. They are compatible with virtually all 3D CAD software and contain metadata such as object color, texture, and material.
- Standard for the Exchange of Product model data (STEP) files store models in an ASCII format, making them compatible with almost all 3D CAD software. It can be easily shared between CAD, CAI, CAM, and CAE software, making it an industry favorite despite its age.
Specialized file formats were created to address specific needs of various industries. These files excel in some areas were neutral and native CAD modeling formats fall short, but may not be suitable for general CAD modeling. Examples include X3D and Autodesk 3DS formats.
What is an STL File?
An STL file describes the surface geometry of a 3D object using a triangular mesh wireframe. STL files do not contain information about color, texture or material. They are often used in 3D printing.
To take advantage of the 3D printing revolution, all you need is a properly prepared digital file. An STL file can be created in a number of ways, including:
- Using a 3D laser scanner to scan your object and build the STL file based on scan data.
- Using line drawings or hand sketches to construct a 3D cad model of your design and export a printable STL file.
- If you have a CAD model in a different format than STL, it can usually be converted to a 3D-printable STL format.
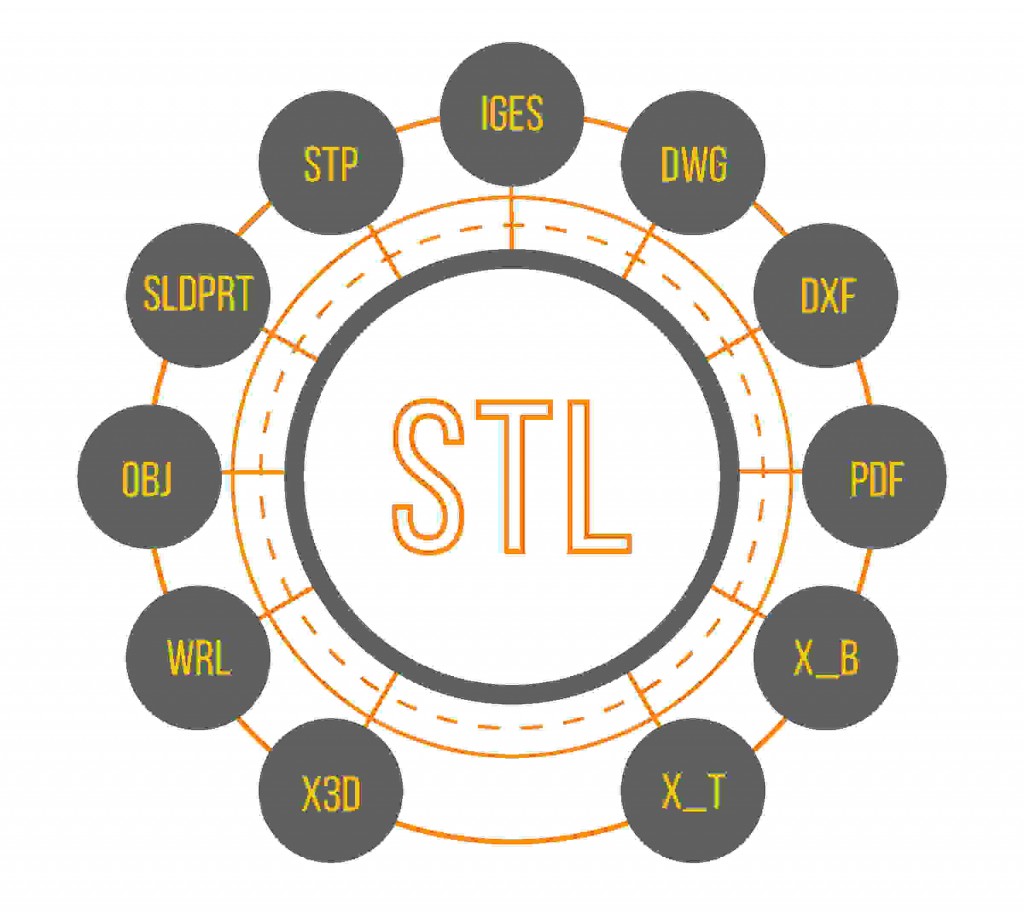
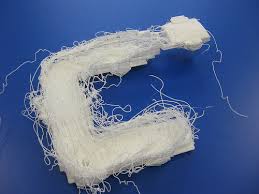
Image of a failed 3D printing job from an improperly prepaired 3D print file
Considerations When Preparing 3D Print Files
- 3D Model Repair: Frequently 3D models exported from CAD software to STL format contain open surfaces or other characteristics that make them unsuitable for 3D printing. These issues must be corrected before the file can be used for your 3D print.
- Scale: In order for your part to print at the correct size, the scale needs to be adjusted properly. Most 3D printers need the file to be in mm or inches.
- Wall thickness: If CAD models that are created for manufacturing are scaled down in size, the wall thicknesses of the model can be too thin for 3D printing. The minimum recommended wall thickness is .030″ for handling strength. If the scaled down model walls are thinner than that, you must revise your model so that it has a wall thickness appropriate for the application.
- Part Mating Tolerances: For parts that need to fit together, you must check your model connection dimensions to make sure they fit with the part it will be attached to.
3D Printing Technologies
There are numerous 3D printing technologies in use today, as well as multiple offshoots of each. Exploring all of them would be an article unto itself. As an introduction, we will look at two common 3D printing technologies, FDM and PloyJet.
FDM stands for Fused Deposition Modeling and falls into the class of material extrusion 3D printing. FDM technology involves pushing a polymer filament through a heated nozzle to melt it and deposit layers to create the part. A common material used is ABS, the same plastic that Legos are made of. FDM parts are good for industrial applications because they are rigid and durable. It is common for people to print parts for actual use.
PolyJet technology uses a liquid polymer that is applied using heads similar to those on an inkjet printer. The polymer is called a “photopolymer” because it is hardened with UV light. A new liquid layer is laid onto each hardened layer, building up the part.
FDM vs. PolyJet
 Fused Deposition Modeling (FDM) and PolyJet are both excellent printing technologies, each with their own strengths. Which is right for your project?
FDM technology is more suited for industrial applications because of its utilization of very durable and sturdy thermoplastics. PolyJet technology on the other hand is better suited for more artistic projects. Because PolyJet employs the use of photopolymers which solidify on contact with UV light, they print with higher resolution and more precision than FDM. That means it also produces smoother surfaces than FDM. It is good for printing small, intricate parts or artistic projects where surface finish is important. The drawback to PolyJet parts is that they are sometimes brittle and over time less stable then the sturdy thermoplastics of FDM technology.
Both technologies have the option of printing in color, but for painting post printing, PolyJet is the better choice.
When looking at the price aspect of these technologies, FDM should be cheaper over the long term because the printing material is cheaper. PolyJet technologies have advanced printing heads that are more expensive to replace and their printing materials can be more expensive as well. What it really comes down to is the application of the printer. Most companies have both types of printers to cover a wide spectrum of printing applications. For the individual user who is doing artistic projects, a PolyJet printer is recommended. For an individual who is building prototypes or working on larger projects that are meant to be used, a FDM printer is advised.
Reverse Engineering & Part Fabrication
Reverse Engineering is the process of thoroughly analyzing the design, composition, construction, and function of a part or device for the purpose of reproducing that part or device.
This is not always the competitive exercise it is portrayed to be. In older machines, sometimes a unique part is difficult or impossible to find. In the modern manufacturing business landscape, product lines are discontinued more rapidly and replacement part production has been scaled back. As a result, parts become extremely difficult to get, if they are available at all, or they are extremely expensive.
In these cases you need to have the part custom made. This has fueled the rising popularity of 3D scanning and 3D printing for fabrication of replacement parts. 3D scanning allows one to capture the shape of any part and have a 3D printable file created based on the scan.
There are a few points to consider before you start begin your journey into 3D printing of replacement parts. This is not meant to dissuade you from using 3D printing for replacement part fabrication. If you consider all of the factors, you will be better prepared for any pitfalls in the process and are more likely to produce a successful part.

1. Is 3D Printing Cost Effective for Fabricating my Replacement Part?
It is typically undesirable to spend more creating a replacement part than the value of the entire item to which the part belongs. However, there can be a business case for maintaining a piece of equipment that is essential to your processes. One should always evaluate the costs of creating the replacement part, versus purchasing that part, versus replacing or upgrading the entire item.
There are also cases in which the item carries an emotional value or is irreplaceable. In that case, you may be willing to spend more to keep the item usable. Even with that, there are always limits no matter the emotional ties.
2. Am I Prepared for an Unknown Total Cost?
3. Can I Modify the 3D CAD Model or STL File Myself?
3D printed parts may not match the accuracy of the original part. 3D printing works within dimensional tolerances depending on the specific printer and material used. That variation increases with the size of the print. This means that the print file must be modified to get the proper fit for tight fitting or mating parts.
Additionally, the wall thickness of the original part may be below the minimum printable wall thickness of the printer. This is specific to the printer and may need to be adjusted before printing.
If you don’t have the software and knowledge to modify the file yourself, you should be prepared to find someone that can do this at additional cost.
4. Do I have the Time & Budget to Try Again if the First 3D Print Fails?
Sometimes the printed result doesn’t work. Or, it may not work within a budget that you are willing to spend. You may need to modify the model, choose a different printing material, choose a different printing method, or go back to the drawing board.
A 3D printed part will not be the same as the original part in many ways. As stated previously, the print accuracy is not the same as the original part. Additionally, the strength or other physical characteristics of the printed part may not match the original, which may cause it to fail. So even if you choose the same material for the print that is used in the original part, it still may not work.
3D printing is a remarkable leap in technology with countless benefits. However, you must accept that you might end up going through a process that does not end in success within the amount you are willing to spend. It’s important to learn about the 3D printing process and understand the requirements of the part and the item to which the part belongs. It can turn out that, as amazing as 3D printing is, the best solution for your use case is traditional machining. Or, it may be more cost-effective to replace the item instead of replacing the part. It’s always better to figure this out before you spend any money.
Quality Inspection
Small 3D printers have tolerances that may cause dimensional variation outside of project specs. Depending on the material used in fabrication, there can also be gaps or deposition patterns or textures. This is common in FDM and other melt extrusion methods of 3D Printing. While the outcome may not be unusable, it may require some machining or touch-ups for use in a working system. It is not as important if the 3D printed object is used as a sample, model, or visual aid.
Large 3D printers can lay down a lot of plastic in a short amount of time, resulting in a rougher form which may not satisfy final finish requirements. Like smaller parts, the larger objects may require machining or finishing work to make them suitable for use. Additionally, melted plastic has a tendency to bend and warp. This effect is relative to the type of plastic used, the thickness of the object’s “walls”, weight, and temperature.
3D scanning can be used for quality inspection to evaluate the final product and make sure it conforms to any specifications you may have. It can detect warping, and bending, gaps, burrs and peices of unwanted material, and even surface textures on your 3D printed part. 3D scanning data can also be used as feedback to modify the original CAD model for the purpose of improving the 3D printed result in the next iteration.
learn more about 3D technology with arrival 3D
Do you enjoy learning about 3D scanning technology? Find more articles about 3D scanning applications and how other companies use this technology here: